
The basics of Unreal Engine’s Blueprint -Beginner’s Guide

Blueprint is the most useful tool in Unreal Engine for a beginner. It basically allows you to code every conceivable system in the game without ever technically looking at a single line of code. All of the functions in Unreal, or the lion’s share of them, are available in blueprint form.
You will never make a spelling mistake that crashes your game, you will be physically unable to plug the wrong object into a function that requires a different type. Basically if it fits together, it works. It takes some of the mystery out of coding.
Check out our guide on C++ vs Blueprints, by the way. It’s Baskin, you can never get enough.
Are unreal blueprints easy?
Unreal Engine’s Blueprint system is a node based scripting system which is perfect for a beginner to build their game fast. You can use blueprint without any coding knowledge and it is perfect for non programmers to start scripting their game.
Here’s an intro to blueprints from the Unreal docs, smarter folk than I to be certain of it.
Should I use blueprint or C++?
If you’re more advanced, you should be coding in C++, it is faster, more efficient, and easier to handle large scale jobs, a huge blueprint becomes impossible to manage. You will also have more career opportunities, and certain features like the SDK require it. That said, I would encourage you to use blueprint as a beginner, it is easy to learn, you can do most of what you need in blueprint. You can go very far on just blueprint, and pick up C++ later on.
Can you use blueprints and C++ together?
This topic, could theoretically encompass it’s own wiki, but since that’s a bit out of my league right now, let’s just get into it:

Welcome to Blueprint
Welcome to Blueprint. It probably doesn’t look very interesting to you but this thing is a beast, I could not possibly write enough tutorials to explain all of it’s features, but let’s see how much we can cover in one lesson.
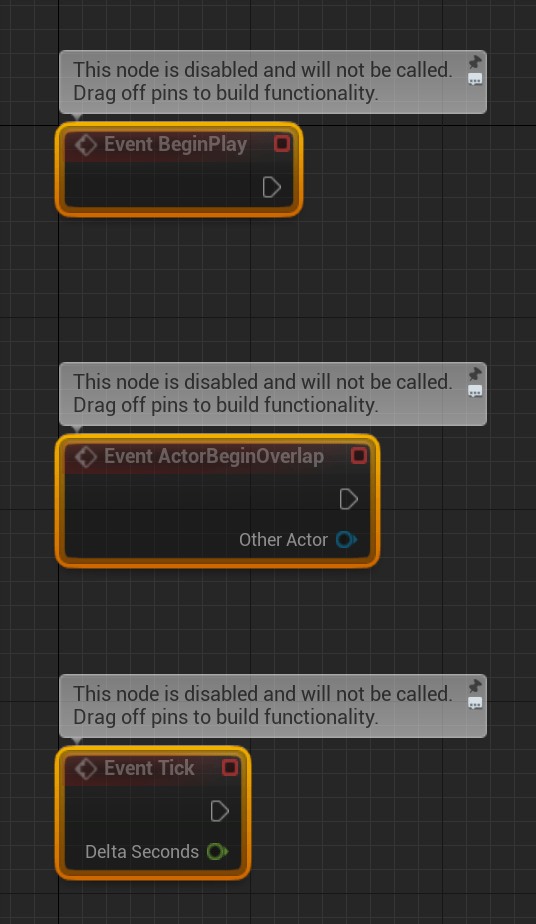
Let’s start with this, in the even graph, we have three functions. Event Begin Play, Event ActorBeginOverlap, and Event Tick.
Event begin play
This would be the Start() function in C#. It is the first function that is called when an object is spawned into a level. So for instance, here I right clicked the even graph, and typed in ‘Destroy’, then I picked from the list of functions, until I found the function, ‘Destroy Actor’.

What does this do? Well as soon as the level starts up, this character destroys itself, immediately. No more functions, build a symphony of functions if you want, this character will just destroy itself in the first second of spawning.
On the left, click ‘New Variable’ in the variables tab. I made one called, ‘CONTINUE_FUNCTIONING’, compiled the blueprint, and set it to true.

Now let’s try a branch node
So I right click on the event graph, and type in branch, I select the branch node, then I drag my new variable on the left into the event graph and plug in the variable into the condition like this;

So what does this do? First, Event Begin Play, the first frame of calculations takes place as the game starts, the branch node runs next, and it checks the condition “CONTINUE_FUNCTIONING”, if it is set to TRUE, then nothing happens and the function continues as normal, this is what the program defaults to based on our default variable choice. If the variable however, is FALSE, then the false node connects to destroy actor, it runs the destroy actor function, and the object is destroyed.
Not sure what this is useful for, besides teaching you the basics of blueprint, maybe you could toggle the variable in the editor to pick and choose which enemies you want to spawn or not in your level.
Event ActorBeginOverlap

Cast to Pawn
Ok so we’re doing a lot in this function. So we have Event ActorBeginOverlap. First thing we’re doing is Cast to Pawn. Casting to something means, confirming that something is an explicit type. So when I cast to pawn, and you can cast to basically any created object, but a pawn is good because it will cast to a possessable moveable character. We drag in the other actor wire and connect it to our Cast to Pawn. So in our first function, it casts to pawn, plugging in ‘other actor’, which is the object that has collided with us, and then it will return true or false depending on whether or not the plugged in actor is a pawn.
There is also the ‘As Pawn’ wire, basically, if the cast to pawn was successful, the ‘As Pawn’ wire will connect you to all of the pawns functions. If you just drag the execution wire out and try to access the pawn’s functions, it won’t even list them as a possibility. So if you want to run a pawn’s particular function, cast to pawn, take the ‘As Pawn’ wire and type out the function you wish to run, then drag the execution wire to run the function at the correct time.
Apply Damage
Unreal is not Unity. In Unity if you have a damage system, you need to code it yourself generally, or buy some out of the box kit, it’s not always easy to retain consistency between different asset packs, you will have to do a lot of modifications yourself.
In Unreal it’s different, they have an idea in their head of the kind of game you’re going to make. Generally they are envisioning a three dimensional action game, where you move around with the standard control scheme, and your gameplay probably, but not always, consists of fighting other characters and enemies. So they have built most of this functionality into the game engine. One of those functions is apply damage. You can buy different character controllers with included attacks and they’ll still probably be able to damage enemies from completely separate enemy AI systems. As long as it works on a system of applying damage like this, you’re probably ok. (no promises situations may differ.)
So let’s get into it:
Get Player Pawn
This is being plugged into the damaged actor input. What’s it doing? Well it’s searching through the list of standardized players in the scene, it picks the first player on the list, at index 0, and sends the return value into the damaged actor input. Then it adds 10, base damage, this is hardcoded but you could also have an input wire with damage amounts that differ or change depending on your conditions. The damage causer is connected to the cast to pawn wire, so the system knows who is dealing the damage. You can also choose damage class (for instance for environmental damage as it’s own category) and event instigator.
Then the character just destroys itself, because why not?

By the way, be sure to check out our subscription service, it’s like Netflix for learning game dev, just sign up for the subscription and watch as many tutorials as you want. You can learn everything you need to know to make a good game here.

So what are we doing here? – Event Tick
In event tick, the function runs roughly every frame, probably faster, so if you want something that’s constantly running at all times, use event tick. It connects into a branch node, which checks our newly created int64 variable to see if it is greater than 4, using the int > int function, and if it is 5 or higher, it runs, “Load Level Instance (by Object Reference)” this will load the next level. Since it’s by object reference I loaded Ancient Ruins by Sidearm Studios.
Up above in the event begin overlap function, we have changed a few things. Now every time you apply damage, I have dragged in a COLLISIONS variable I’ve created, with the GET function. Then I used int + int by dragging the collisions wire out from the GET function, and incremented the variable by one, I then drag in the variable a second time, and choose SET. SET will change the variable to whatever you set it to in the input wire, in our case, it’s current value plus 1.
Then after five of these collisions have triggered, the Event Tick will notice that COLLISIONS is at or above 5, and they will load the next level.
Google your problems
Another thing to note about blueprint, is that, although I think I have just given you a basic overview of the way order of operations and flow of execution works in Blueprint, and you now know the basics of how functions operate, at first you’re going to be really lost, don’t worry, you’ll get through it.
There is so much to learn about blueprint, it could take 100 articles and not cover everything, an encyclopedia would be more up to the task, and I encourage you to check out the unreal documentation whenever needed.
What you’ll really need to do is get good at googling the specific problem you have encountered, the answers are all out there, but you need to know how to ask.
I know this seems really elementary, but for instance, if you google:
“how do i do something when i press a key unreal blueprint”
Sometimes it’s hard to conceptualize what you’re trying to do in the form of a question, but rest assured, after you’ve worked with the engine for a few months or years, you’ll eventually know how to do whatever you want. Eventually you won’t even need a tutorial, you can just code your own systems from scratch.
The Official Documentation
Go here for the official documentation, you will get an idea how expansive this topic really is.

You can also find this on the Unreal Documentation:

A quick introduction to variables
If you have zero programming experience, you might not even know what a variable is. A variable is a structure used to store a particular type of information, here are the basic variable types. Boolean, Byte, Integer, Integer 64, Float, Name, String, Text, Vector, Rotator, Transform, Object.
A bool is something that is either true or false, it is very useful when you need a direct delineation between something happening or not happening, it’s used for conditions, you can chain conditions so the bool at the end might be constructed from 20 different bools leading up to it.
Bytes, I don’t use them much, it is a whole number between 0 and 255.
Use int instead unless you are advanced, an integer is a whole number, so no fractions, it goes up very high, but if you want a bigger int, use int64.
Float, but what if you want those fractions, then you use a float, not much more to say about that. If you need the number 1.665, use a float, or it’s not going to work.
Name, is a string of characters that makes up somethings name in the game.
String, this is any collection of letters or numbers and symbols from the keyboard, or any number of different languages, this sentence I am writing currently is a string. Very useful in any number of situations, and you can perform complex operations on strings.
Text, and note these are all color coded, text is useful if you are displaying words in the game itself, like a HUD element displaying the name of a selected object.
Vectors are a location in 3D Space, with an x, y, and z coordinate. Manipulate them to move your character around.
Rotator, is like a vector, with an x, y, and z axis, but instead you are rotating your object along the axis, instead of moving it.
Transform, our orange friend, combines position, rotation, and scale, basically anything that physically exists within your level has one of these. All movement, rotation, and scaling takes place in the transform.
Objects
And finally, the last type, Object, probably the most useful. An object is an assembly of different systems and functions you have assembled into one specific item. You can access all the functions of an object through blueprint, as well as any of it’s component pieces. Object oriented programming is very important to a coder, generally speaking, everything is made up of objects. An object can be cloned and then altered, you can inherit all the functions and variables from an object, and then add new functionality on top of it, to make different variants, and then you can split those variants off into their own child objects. Any object deriving from another object is called a child object, the object it derives from is called the parent object. This is a topic in itself, but rest assured, objects are very useful.
So with that, we have scratched a hair off the cement slab which is this topic
Now seems a reasonable time to wrap things up. You’ve got an overview of how Blueprint operates, now try doing something in blueprint yourself, the most important part of game dev is experimenting on your own.
Eventually you will learn everything you need to know about blueprint, and you’ll be well on your way to making your first real game.
Gamedev.gg out!


Responses